
My top 10 tools for starting with polymer clay
When you first start new craft, there's always an overwhelming number of possible supplies, mostly recommended by retailers trying to get you to buy as much as possible from them. I don’t sell tools or equipment so have no vested interest in influencing you to buy anything, nor am I affiliated to any organisation so I won’t be receiving any commission for the links which follow! Also note that I have not hunted around for the best prices; the links are there solely as examples of similar products to those which I use everyday.
I have assumed that you already have a normal domestic oven. I believe it’s also possible to bake polymer clay in an airfryer but I’ve never tried this as I don’t have one. For reference, I use a microwave combi oven in the studio, solely on the oven function. You cannot microwave polymer clay!
The items that follow are the tools I would buy if I was starting again as a newbie to polymer clay, but with the benefit of hindsight, knowing how I like to work and what I tend to make. You may be able to find some things around the house, or maybe make ‘substitutions’ instead of buying new, so be resourceful and see what you already have! I have listed two items as my ‘number 7’ as I’m not suggesting you should buy a pasta machine straight away - but knowing what I know now, I would have done!
My ‘go to’ tool set
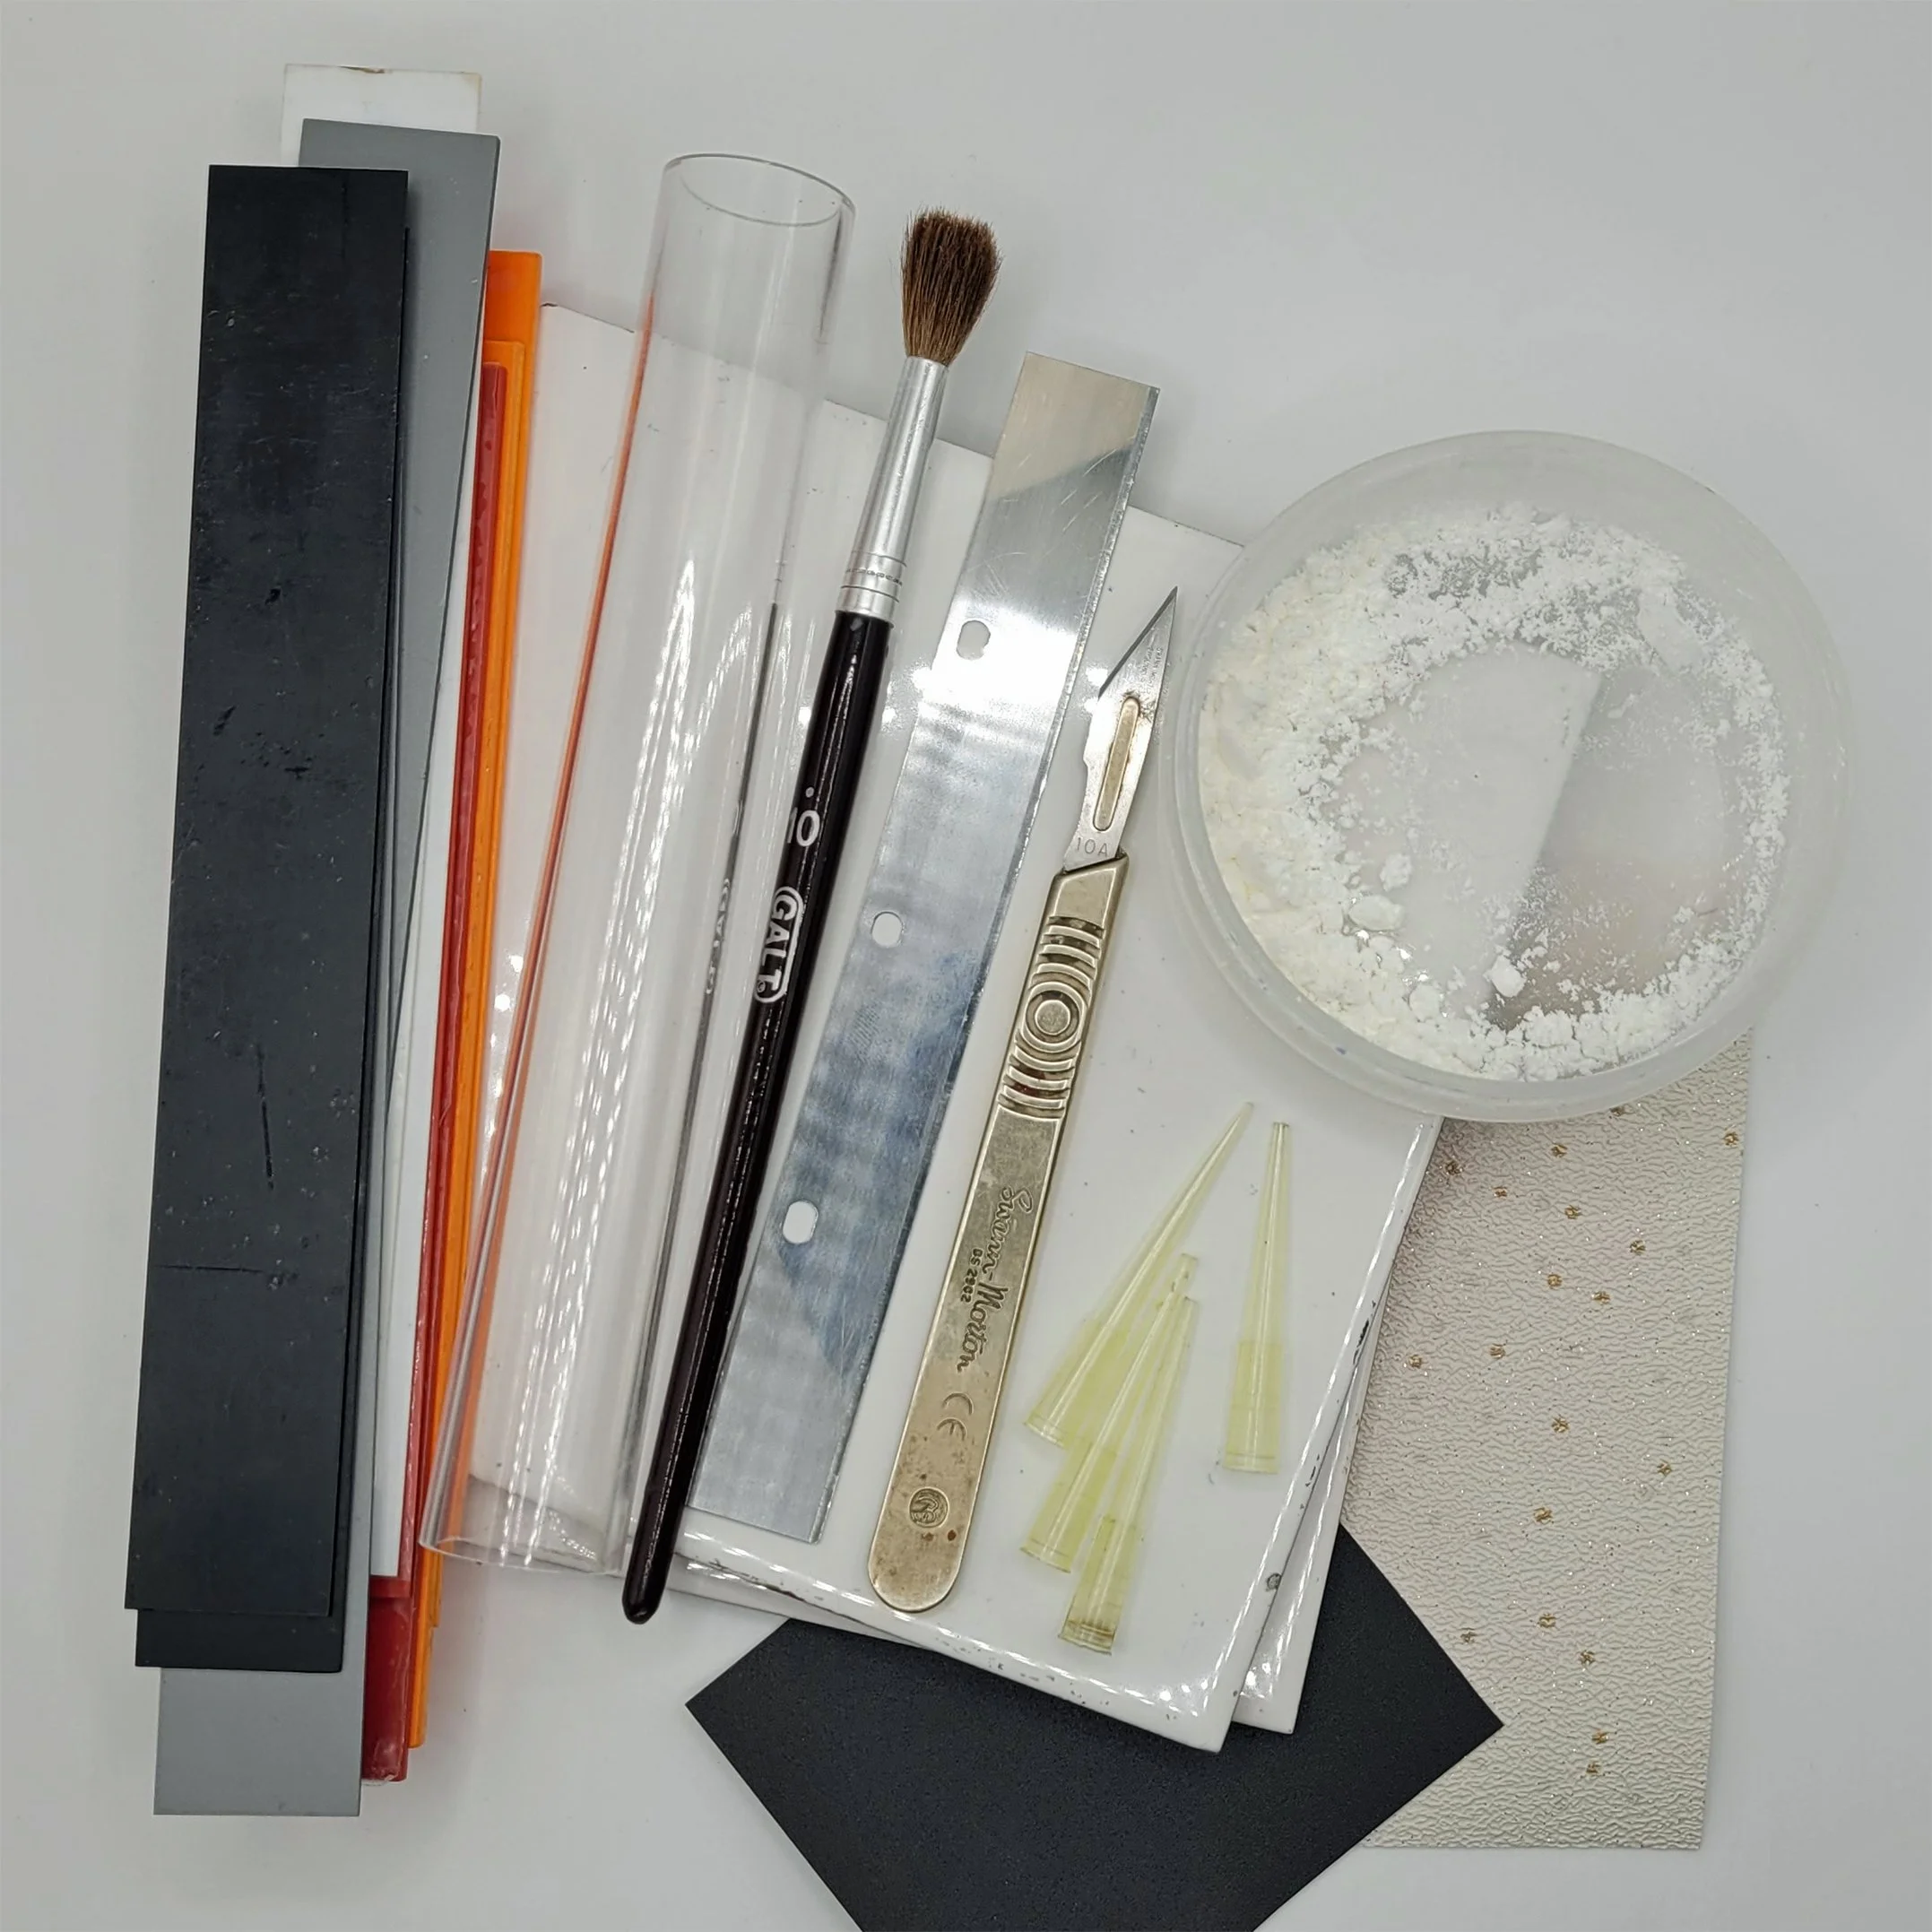
Acrylic roller – an acrylic roller is great for rolling sheets of clay. My roller is hollow but they can be bought as a solid. The roller should be non-stick and can also be used as a burnisher (place a sheet of paper between the clay and the roller to do this). If you’re sourcing items around the house, a steel tube or thick metal drinking straw would work too, but don’t use a wooden rolling pin or plastic plumbing pipe - they’ll stick and cannot be cleaned as easily.
Ceramic tiles – the ideal surface for working on and baking clay! At 150mm square or thereabouts, it’s easy to put multiples in the oven, and they can be stored without taking up too much space, when they’re not in use. The tiles don't need to be anything special, just smooth, which makes them easy to clean. You may already have a few leftovers in a shed, or scour boot sales/charity shops for these or the bin ends in tile shops. 3 - 4 would be a reasonable number to start with.
Clay Blade – used for chopping clay blocks, slicing canes and mokume gane slivers, and removing sheets of clay from your tiles, look after this tool and it will last. The blades can be bought with handles, but personally, I find that they get in the way, so when you first get it, add a coloured line with a permanent marker to the non-cutting side and aim to pick it up on this edge so you’re less likely to cut yourself. Clean the blade with a wet wipe from the blunt side and allow it to dry before storing. Clay blades are usually flexible which is great as it means you can cut curves as well as straight lines, and they’re also available with wavy edges. Do not use your clay blade for cutting clay wrappers or paper etc. as it’ll spoil the cutting edge.
Cornflour and Brush – cornflour is used as a release agent. Dust it lightly over your clay with a soft brush to prevent it sticking to your cutters and textures. Talcum powder can also be used as an alternative or use a fine mist from a spray bottle of water if you don’t want the residual dust from the powders.
Pipette Tips – When I first started working with polymer clay, I began by making jewellery. Cocktail sticks will poke a hole and they’re great for bead making, but I made lots of earrings and needed to cut a hole rather than poke one. The pipette tips are idea for this as you can trim them with a craft knife towards the collar to create bigger holes if needed. They last for ages, but if you don’t want to buy these, use any fine tapered shape to cut holes in your clay pieces: the tip end of an old pen (with nib removed) or any thin rigid tubing.
Swann Morton Scalpel – I’ve had my Swann Morton handle since my twenties and I use it with a 10A blade. Cheaper craft knives are available but I like the feel of the slightly weighty handle in my hand and the sharply pointed blade for accurate cutting of clay shapes, veneers and beads.
Spacer bars – these act as depth gauges, allowing you to roll out your clay between them as they support the roller at each end. They come in varying thicknesses and can be bought individually. If you don't want to buy these, you could make equivalents by cutting strips of card and gluing together in multiple stacks. They’re great when you’re first starting out but I have to confess that I rarely use mine for polymer clay now as I have invested in a Pasta machine. If you’re working with polymer clay frequently, this might be a better purchase but it’s obviously more of an investment. It takes the hard work out of conditioning your clay and allows for different thickness clay sheets to be rolled out without as much stress on your hands, but don't buy one until you know you love the craft! Marcato Atlas are a popular brand, mine is the Imperia model in the link which has a wooden handle which I prefer. Less expensive clay roller machines are also available.
Textured Wallpaper – this should be a randomly textured vinyl wallpaper (the pattern/colour doesn’t matter). A vinyl paper doesn’t absorb the oils from the clay and is therefore, far less likely to stick to your clay. It’s great for hiding fingerprints on the backs of pendants and earrings and if you’ve been to one of my polymer clay classes, chances are you’ll be using this technique too now to finish your beads as neatly as possible! Textured vinyls can also be used on the front of your pieces and both the Lilac Strata Necklace and Spotlight Oval Necklace are examples where I’ve done this. A green scourer or toothbrush could also be used to achieve a similar effect.
Wet & Dry Paper - I use wet & dry paper for sanding my work. I don’t use sandpaper or a power tool with a sanding attachment for this because of the dust. Both the latter options allow the dust to float in the atmosphere which means either I’m going to breath it in unless I wear a mask, or it’s going to land in the studio, making my workspace dusty. By sanding pieces in a bowl of warm water with the Wet & Dry, the debris is caught in the water and the pieces are rinsed at the same time. Much safer and cleaner in my opinion and makes sanding quite a meditative process! I use 400 grit initially and then finer and finer grades to achieve a super silky finish.
Wet wipes – maybe these aren’t really a tool, and I didn’t think it necessary to include them in the pic above, but I couldn’t work without them. I use them all the time for cleaning tools and my workspace, for blotting, and for drying (I keep the cleaner ones that dry out for this purpose).
So, I hope this list is helpful! If you’ve got any questions, drop me a message and I’ll try and help. I’ll follow up with the equivalent list for Silver Clay next month.