
Silver Clay essentials
Silver clay offers endless possibilities for creative expression, allowing makers to shape, texture, and fire precious metal from a pliable medium. Silver Clay Jewellery for Beginners is one of my most popular workshops and I’m often asked what’s needed when you’re first starting out so here are the tools we use in the studio and my guide to the essentials…
Work surface: This might be Teflon sheet or a small ceramic tile. Teflon baking sheet is easy to cut up into small pieces to work with. We usually tape it to the tile while we’re working to give a stable work surface.
Roller and spacers: You’ll need an acrylic roller and some spacer bars which support the roller to allow you to achieve a smooth, even sheet of clay at various thicknesses.
Texture sheets: Your design might involve texturing your clay. This can be achieved with rubber sheets sold especially for this, available in all sorts of beautiful designs. You can also use vinyl wallpapers or textured plastic food packaging. If you’re feeling really creative, try making your own texture sheets with polymer clay. This one (brown sheet on the left) was created using dried lavender. And don’t forget about using plant material - look for leaves with good vein structure, shells, lichen, pebbles etc.
Cutters: plastic or metal, these needn’t break the bank. You may already have some little cutters in the kitchen, which you could repurpose for your silver clay. Just be aware that they shouldn’t be used for food use again, afterwards. You’ll also need some tiny cutters to make the holes for your jump rings and a scalpel blade or craft knife is always useful.
Olive oil: Any of the above items which come into contact with the silver clay, need the lightest coating of olive oil to prevent the clay from sticking to them. I have half a washing up sponge drizzled with oil in a plastic tub, which I keep for this and usually apply the oil with an old, stiff bristle paint brush or toothbrush.
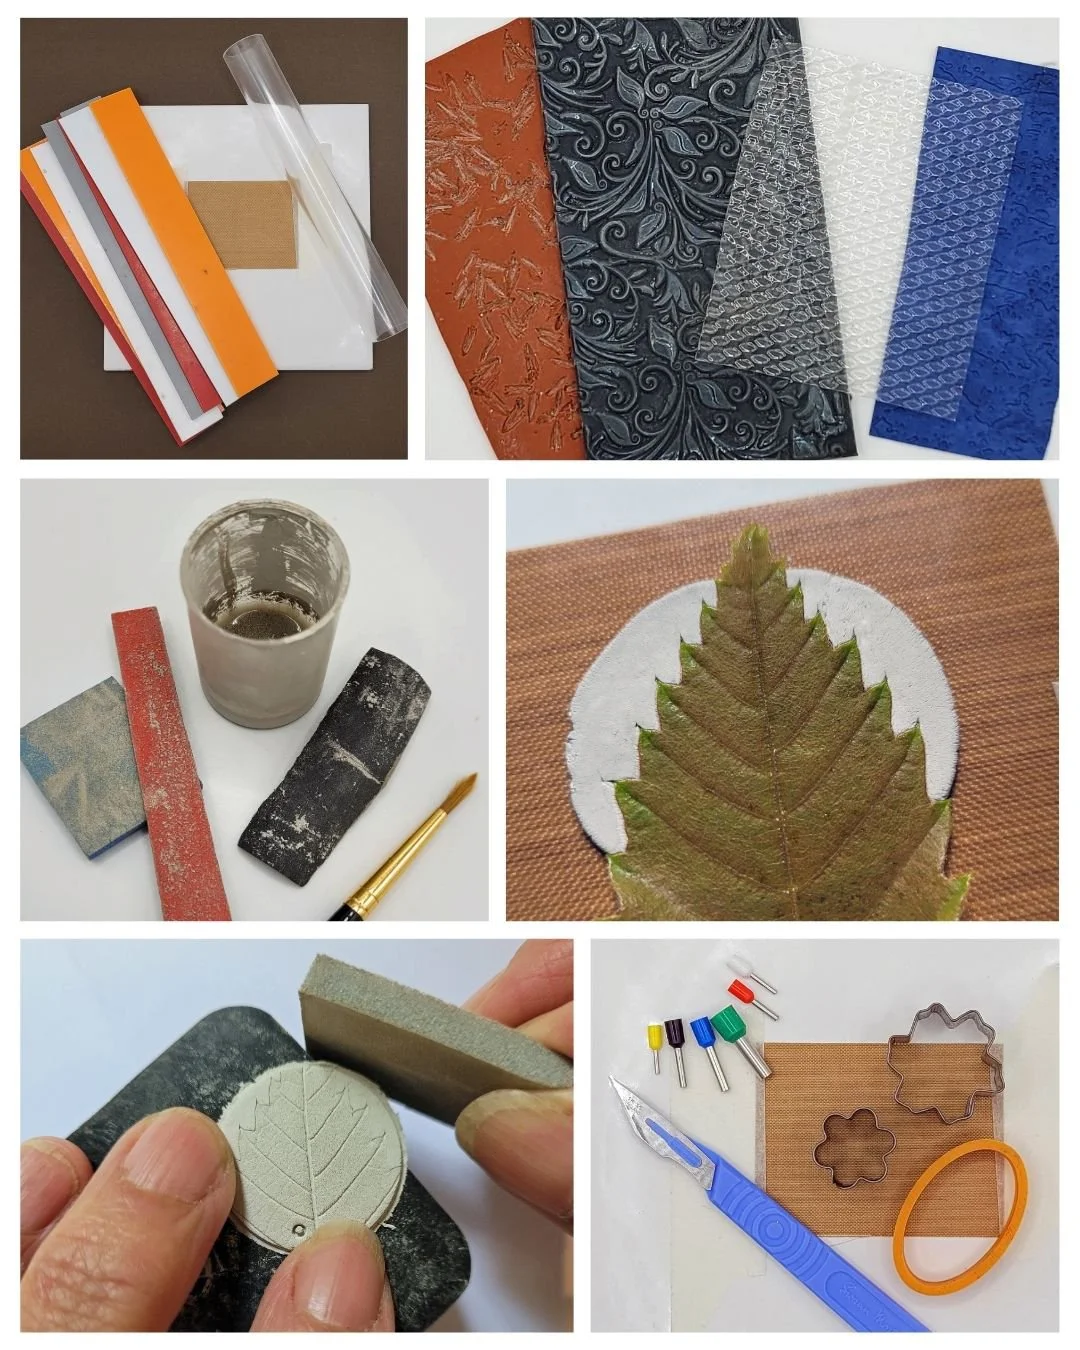
Refining: Once you’ve made your piece, you’ll need to leave it to dry before you can move on to sanding and refining. We use a mix of sanding sponge, wet and dry paper or emery boards in the classes. Sanding sponge is sponge on one side and has an abrasive surface available in different grits, on the other. The dry clay piece is supported on a rubber block whilst the edges are sanded, textures are refined and any irregularities are filled or removed. A soft paintbrush and pot of water are also useful for cleaning up blemishes. Keep the sanding dust in airtight pot with a little water added, to create your own clay paste for filling holes or mending a break.
When you’re ready to fire your work, you’ll need a fibre brick, two spoons, a pot of water, safety glasses and a torch. The brick is heatproof and supports the silver whilst it is fired. Once the firing process is completed, the spoons are used to move the work off the brick, into the water (I find this easier than using tweezers). A kitchen timer or stopwatch is also needed to ensure you fire your work for long enough.
Finally, you’re ready to polish your silver. This is done with brushes: stainless steel first, and then brass for buffing. To get into any fiddly nooks and crannies, a steel or agate burnisher is invaluable.

Whether you're crafting delicate pendants or bold statement pieces, the right tools empower you to shape your ideas, develop your skills and grow in confidence. As with any creative process, the tools you choose become part of your artistic practice, helping you refine your technique, and supporting the joy of making.